Games
/Entertainment
White to Play
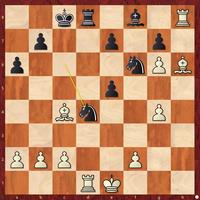
We’re going to start a series of instructional games from the “good ol’ days” of early to mid 20th century chess. If you play through the games, it will add to your strength as a chess player because you will learn some new ideas. Our first game is Noteboom,D. - Mindeno,S. Holland, 1927 1.e4 c6 2.Nf3 d5 3.Nc3 Bg4 4.h3 Bh5 5.exd5 ...
View solution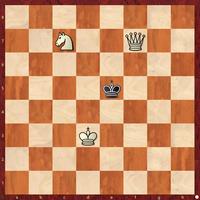
White to Play
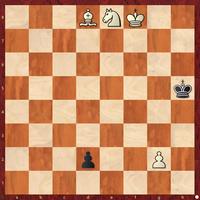
A mate in three. And a very irritating mate in three as there are so few pieces on the board. This. will end our composed problems for a while. Hope you found them challenging. Hint—the only check is the mating check.
View solution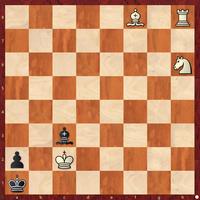
White to Play
A mate in three. I was reminded of the Star Wars line, “It’s a trap! It’s a trap!”
View solution
White to Play
Composed problems like this drive me crazy. It’s a mate in three. The only hint I can give you is that the only check is the last one, which is mate. Don’t look at the answer. Take the weekend, but try to solve it.
View solution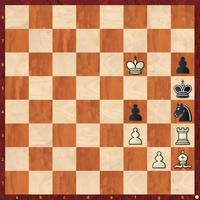
White to Play
This is a very special mate in three as the choices are few since it is a very restricted position. In one sense, though, anything goes!
View solution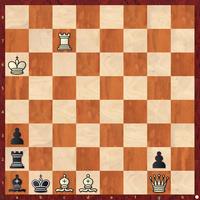
White to Play
OK, enough with the in-depth chess lessons! Recreational change of pace—composed chess problems. This one’s a mate in two. Have fun!
View solution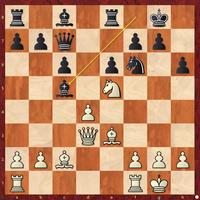
White to Play
This will be our last Isolated Queen Pawn lesson. In fifteen lessons,if you studied the positions and some of the full games offered, you added to your chess knowledge. Today’s game is special in that you get to see an unusual aspect of the attack. Then, you get a thorough study of what might have happened if Black had defended more resolutely...
View solution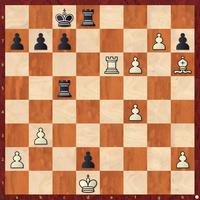
White to Play
GM Carlos Torre was giving a simultaneous exhibition in 1924 when he reached this position as White. Unable to find a defense to the threatened Rc1, he resigned. He missed a saving line! Can you save the game for White?
View solution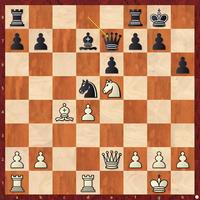
White to Play
This is another classic Botvinnik game. No mating attack. Not even a win of material. He just gets a better position with a key move that, positionally speaking, is decisive. You get the whole game today because it’s a great lesson on how to win an endgame with an advantage even though material is even. The game started out with 1.Nf3 d5 2.d4...
View solution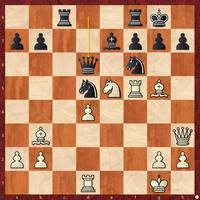
White to Play
If you have studied each of the prior isolated queen pawn positions, you should have a shot at knowing what to do here. The game is a famous one, fully annotated in my Openings for Amateurs—Next Steps book. It starts out Botvinnik,M. - Vidmar,M. Nottingham, 1936 1.c4 e6 2.Nf3 d5 3.d4 Nf6 4.Bg5 Be7 5.Nc3 0–0 6.e3 Nbd7 7.Bd3 c5 8.0–0 cxd4 9....
View solution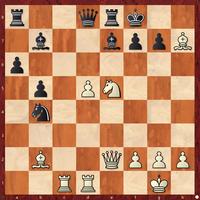
White to Play
Black tries his best to defend a key square only to get mated.
View solution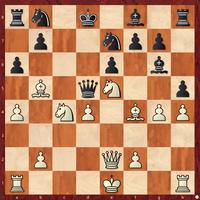
White to Play
A very unusual position. Here’s what you need to know. It is a won position. The way taken by White is amazing. In the final mating position, White has only his queen, bishop and some pawns while Black has his two rooks, queen, two knights, and two bishops and a bunch of pawns!
View solution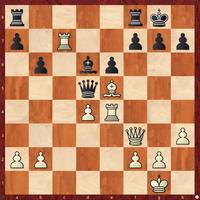
White to Play
You also have to be tactically alert in IQP middle game positions. Here only one first move wins.
View solution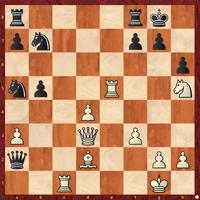
White to Play
Hope you had a nice three day weekend. This is a position option taken from a game Euwe won in 1934.
View solution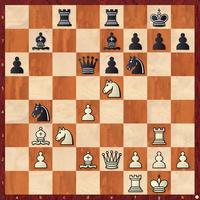
White to Play
Isolated Queen Pawn based attacks can get quite complicated. This game is interesting because Black didn’t pick the most tenacious defense. The engine gave an alternative, yet still had White winning, so the sac was sound; however, I let the engine run on the alternative, and it says it is decisive. Play it through. It’s a lot tougher than ...
View solution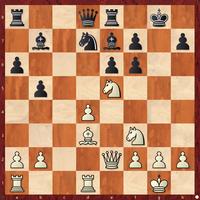
White to Play
This is a wonderful position for an IQP lesson. There is more than one way to win, even in the variations. The themes we have already seen are in there with some you haven’t. There is the N on e5, the weaknesses on f7 and e6 and the Q and B teamwork. Have fun looking at the possibilities!
View solution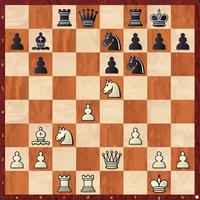
White to Play
Here’s another instructional game on how winning material can often come from IQP positions because of the mobility of the White pieces. The diagram is a model position for such starting points, and the modeler is none other than the late world champion, Botvinnik, who was superb in such positions.
View solution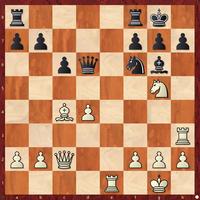
White to Play
Not all Isolated Queen Pawn attacking positions lead to mate. Sometimes, it’s just getting a winning ending from the attack, as is the case here.
View solution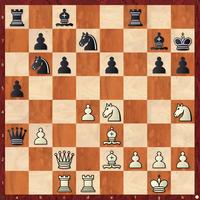
White to Play
The key to this is recognizing the indirect attack on the Black king by the White queen.
View solution
